Many users report that they experience some errors at times, including the “AnyDesk is not connected to the server” error.
The root causes of this connection issue include incorrect settings, an outdated AnyDesk version, network or firewall issues, wrong file permissions, and corrupt installation files.
Fortunately, there are several ways to resolve this technical fault.
Table of contens
- Check your internet connection
- Reset the User Setting
- Update the Anydesk software
- Allow AnyDesk through Firewall
- Check Your File Permissions
- Check your router settings
- Disable IPv6
Check your internet connection
The first thing you need to do if you encounter a connection issue with AnyDesk is to check whether your device is connecting to the internet properly. Also, ensure that all the required ports are open. AnyDesk uses the 80, 443, and 6568 Ports to establish the connection.
If your computer is connected to a wireless connection, try using a wired connection to see if this resolves the issue. But if the errors are caused by a network issue, run an internet speed test to check the ping time and internet speed. Low internet speed and long ping times can cause Anydesk connection issues.
If the error still persists, try the next troubleshooting steps to resolve it.
Reset the User Setting
Another reason why AnyDesk users are unable to connect to the server has something to do with the user account settings. So, if connecting your AnyDesk in Windows 10 or 11 to the server isn’t successful, try resetting the user settings to solve the technical issues.
Here are the steps for resetting your AnyDesk account and fixing the connection errors:
Step 1: Open the AnyDesk app and go to Menu.
Step 2: Choose Settings and click User Interface.
Step 3: Click Reset AnyDesk to reset AnyDesk and resolve any settings-related issues.
Update the Anydesk software
Using an older version of the AnyDesk application may cause an array of issues in AnyDesk in Windows 11 or 10, including the “AnyDesk Not Connected to Server” error. Hence, try downloading the software’s new version to see if it can solve the issue.
To get the latest version of AnyDesk and remove the errors, follow these simple steps:
Step 1: Open the AnyDesk app.
Step 2: If you are using an outdated version of the software, you will see a message under the remote desk option saying, “A newer version of AnyDesk is available. Click to update.”
Step 3: Just click that message to download the latest version of AnyDesk in Windows.
Step 4: Install the app after downloading it, and try running it again to see if you can connect to the server.
If you’re still having issues connecting AnyDesk to the server, try the following method.
Allow AnyDesk through Firewall
Many users have a firewall, but they have no idea that it may be the cause of the “AnyDesk Not Connected to Server” error.”
So, when using AnyDesk in Windows 10 or 11, make sure that the firewall allows the app to run properly and that no security software is hindering it from connecting to the server. Also, if you are using a VPN, make sure to enable AnyDesk for the VPN connection.
If AnyDesk in Windows is not allowed to pass through the firewall, you may need to add the app to the Exception List in your firewall settings.
To make some changes in your firewall settings, follow the easy steps below:
Step 1: Go to Settings and search Windows Defender Firewall.
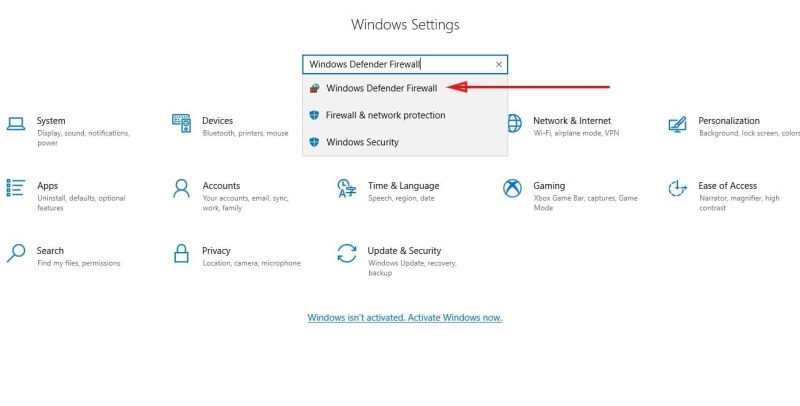
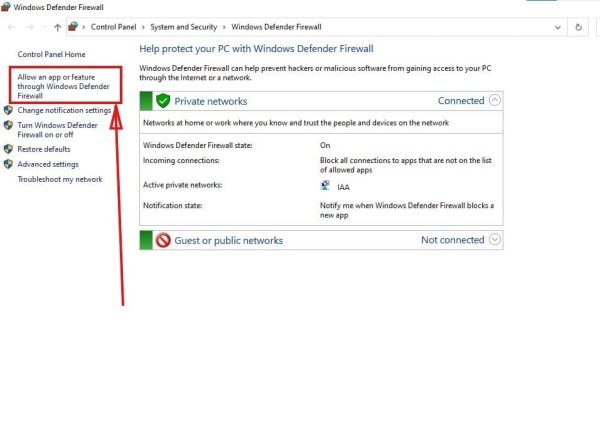
Step 2: On the left panel, select Allow Apps to Communicate through Windows Defender Firewall.
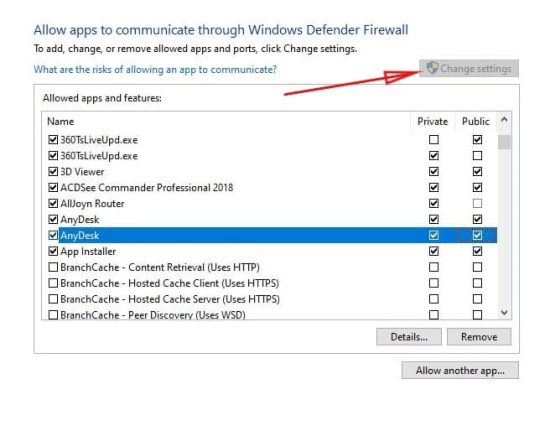
Step 3: Choose Change Settings and chose Anydesk from the list.
In case the list doesn’t contain AnyDesk click Allow another App. Look for AnyDesk in the Programs File, and then Allow the software privately and publicly, according to the photo below. Afterward, click OK.
When using an external hardware firewall, users will need to whitelist AnyDesk for particular scans like “Deep Packet Inspection” or “HTTPS Scanning.” Keep in mind that these come in various names depending on the producer.
Occasionally, these scans obstruct AnyDesk’s secured TLS signal, resulting in the connection dropping from time to time.
If you still experience errors after checking your firewall settings, then do the next troubleshooting step to resolve the issues.
Check Your File Permissions
Permissions are actions that users are allowed to do on a computer or any device. So, when it comes to accessing the remote computer, it’s important that your user account has the required permissions. Otherwise, it will cause the “AnyDesk is not connected to the server” error.
If you believe you have the wrong permissions, follow the steps below to change the permissions for your user account in AnyDesk and solve the issues.
Step 1: Open the AnyDesk app and go to the user account settings. Open the Security tab then modify the permissions to allow connection to the remote computer.
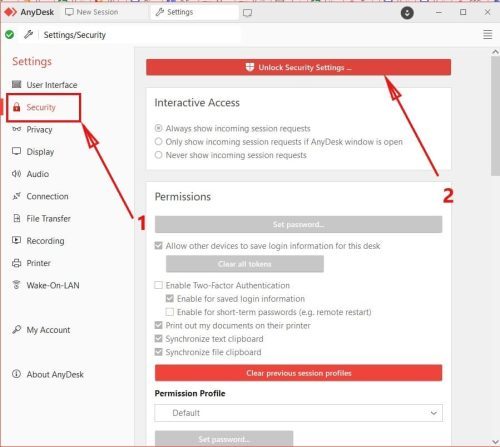
Step 2: Set the permissions properly as shown in the picture below and try accessing the remote computer again.
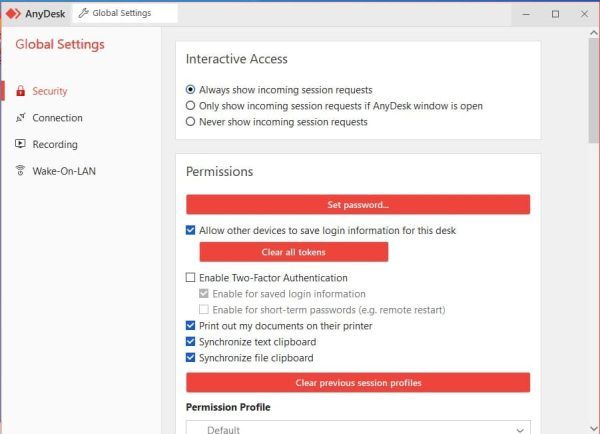
If the “AnyDesk is not connected to the server” issue persists after modifying your file permissions, open a new user account and try connecting using that account.
Check your router settings
If your AnyDesk in Windows 11 or 10 can’t connect to the server, your router settings may be the cause of the error. To resolve this, you should check your router settings and see if your computer is connected to the network.
To check your router settings in Windows, follow these easy steps:
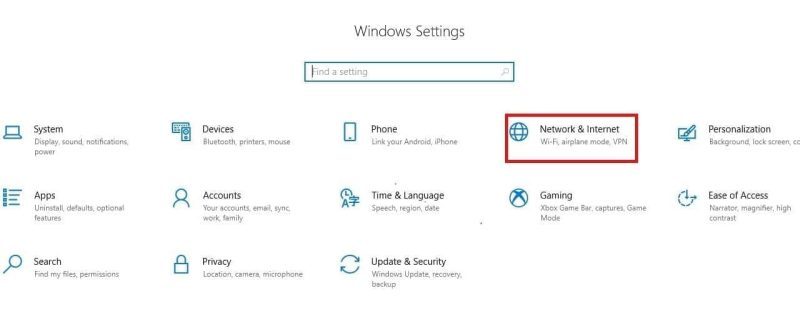
Step 1: Go to the Start menu and choose Settings. Then, select Network & Internet.
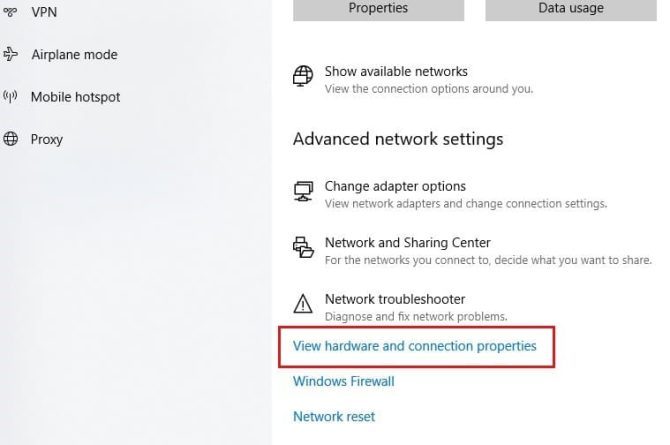
Step 2: Select Status. Then, click View hardware connection properties under Advanced network settings.
Step 3: Browse the Default gateway on the list. The numbers next to it represent your IP address.
Step 4: Copy the IP address and paste it into the browser’s URL bar. Then, press Enter. You will then be taken to your router’s login page.
Step 5: Type in your login credentials to view your router’s settings. Make sure that your IP address is set to automatic and that your computer’s MAC address is correct.
Step 6: If you continue to experience the “AnyDesk Not Connected to Server” error, try resetting your router to see if connecting to the remote computer is now possible.
If you still experience technical issues, try the final method below.
Disable IPv6
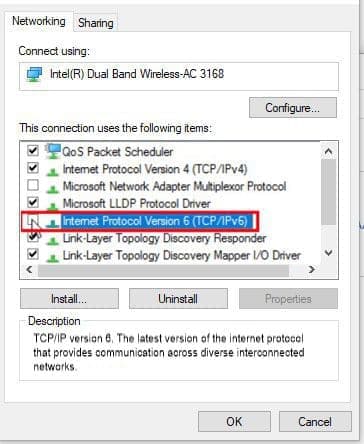
Internet Protocol Version 6, or IPv6, for short, is a network layer protocol that allows communications and data transmissions to take place over the network. Some users suggest that IPv6 can be the cause of the disconnection and that disabling it can resolve the connection issue in AnyDesk in Windows.
You can turn it off in your computer’s settings. Just follow the simple steps below
Step 1: Go to Settings and type Control Panel in the search bar.
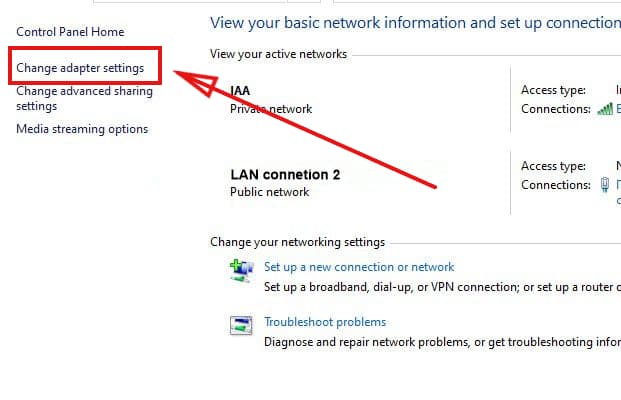
Step 2: Choose Network and Internet, then click Network and Sharing Center. Select Change adapter settings next.
Step 3: Click your network connection twice and select Properties from the window.
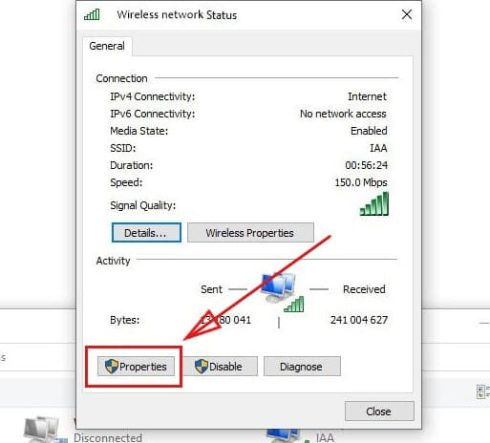
Step 4: Uncheck the box next to “Internet Protocol Version 6” and click OK.
